Creating a new Campaign Using HTML Code

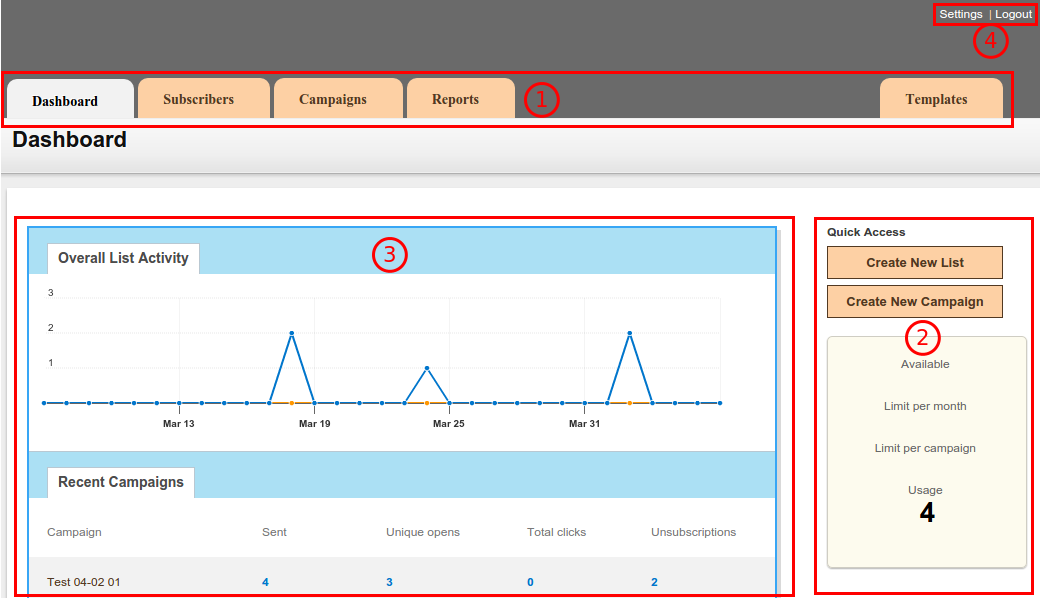
There are two ways in which anyone can start creating a new campaign irrespective of the method they use. You can use “Campaigns” tab or if you are on the Dashboard you can click on the “Create New Campaign” link under the Quick Links.

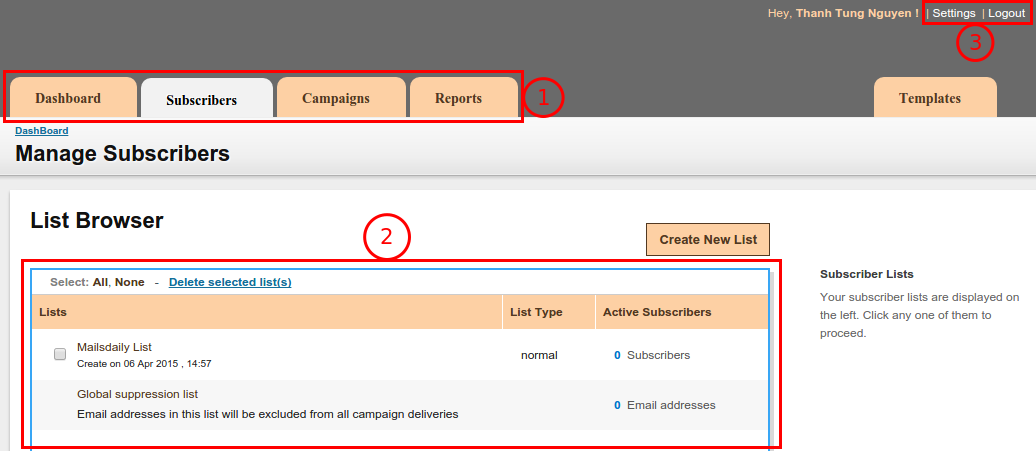
  • Click on the “Campaigns” tab
  • Click on the “Create New campaign” under the campaign browser

Selection_011

If you look at the campaign browser screenshot above, you will realize that it gives you the ability to browse through the campaigns within your account. You will also be able to track all the campaigns which are sent, are in outbox, are being created and in draft mode, are scheduled, are paused and are pending approval.

You can manage tags which can allow you to categorize your campaigns.
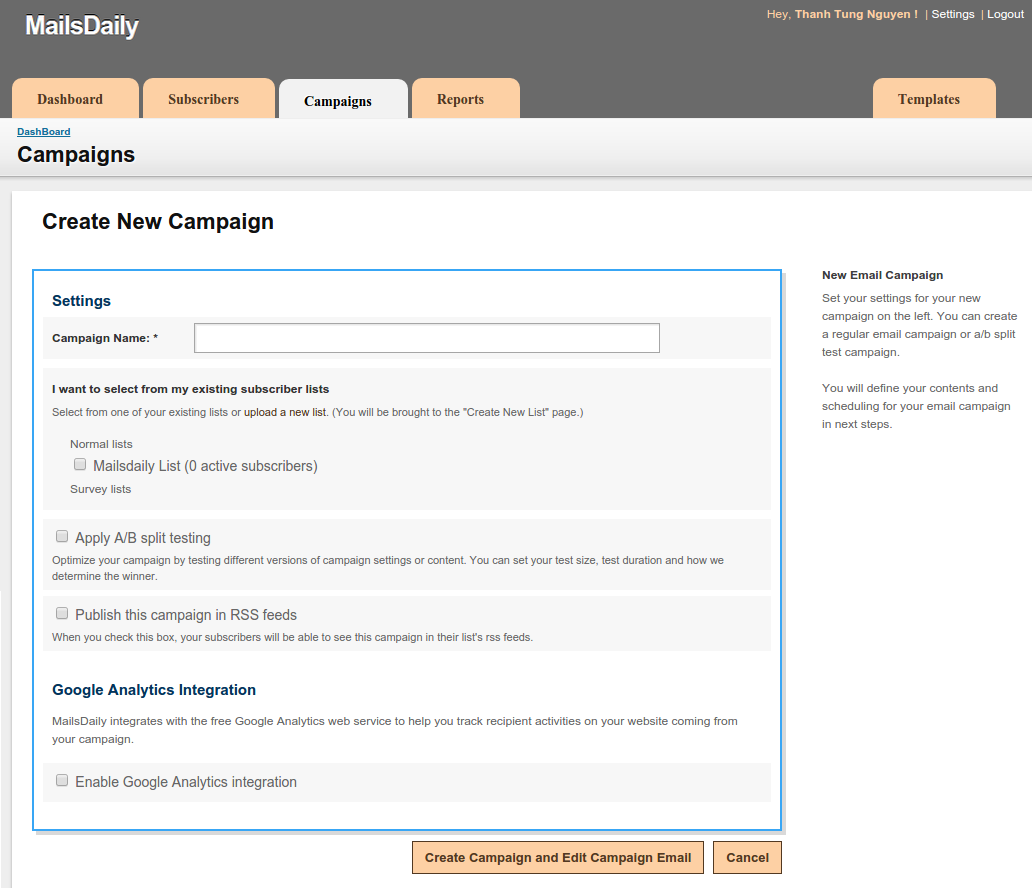
Selection_012

Campaign Name
Enter the name of your campaign

Recipients
Select the mailing list or a segment for your campaign.You can select single or multiple lists of segments.

Apply A/B Split Testing
By applying A/B split testing you can test different versions of your campaign settings or content. You can set the test size, duration and how to determine the winner. This helps you optimize your campaign in a better manner.

Publish this campaign to RSS Feed
When you check this box, your subscribers will be able to see this campaign in their list’s rss feeds.

Google Analytics Integration
MailsDaily integrates seamlessly with the Google Analytics web service to help you track recipient activities on your website coming from your campaign.

We will learn about this feature in details in a separate topic – click here for detailed information.

  • When you are done populating these fields hit the “Create Campaign and Edit Campaign Email”
  • This will bring up the create new campaign selection screen.
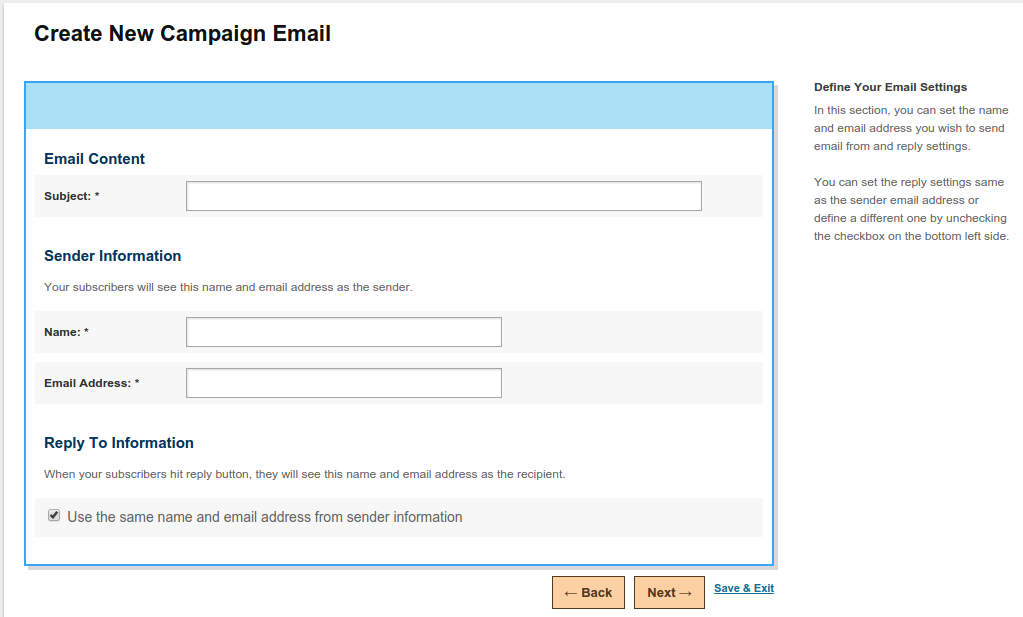
Selection_014

Subject
Define the subject line for your campaign email.

Name
Enter the name which will be used for the from field of your campaign email

Email address
Enter the email address which will be used for the from email field of your campaign email.

Reply to Information
You can use the same reply to information defined the name and email address fields above or use the new one by un-checking the option and entering the different reply-to information

  • Click on the “Next” button to go to the Content part of the campaign email creation.

Selection_015

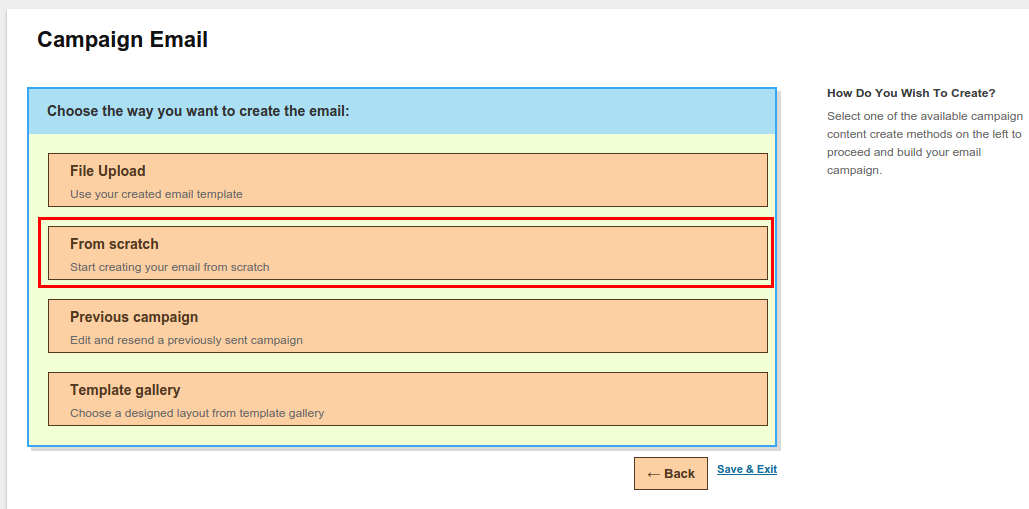
  • Click on the first option “From Scratch”
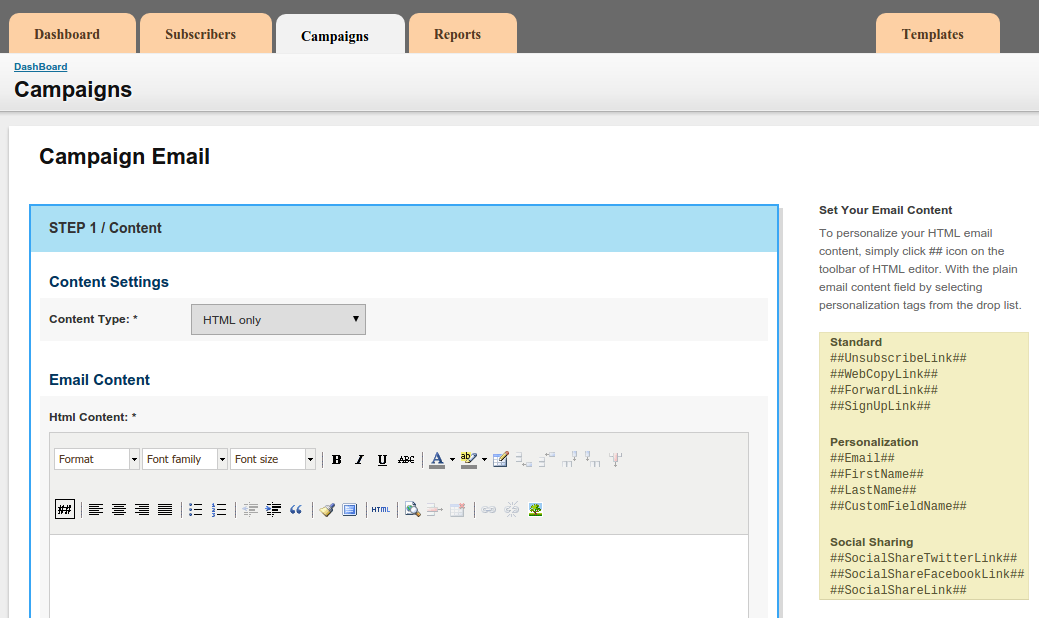
Selection_016

Content Type
Select the content type – whether you are going to send an HTML email or Text. You can also send a multi-part email which will carry HTML as well TEXT based content and render it at the end-users end according to their email reader.

HTML Content
Add the custom html content you created for your newsletter or you can directly create the custom content using the editor available.

Please note that you must add “unsubscription” link within your content to comply with the policy.

You can do that by clicking on “##” icon within the content editor and then selecting the un-subscription link.

Click on the “Next” button to go to the last step of the campaign email creation.

Selection_018

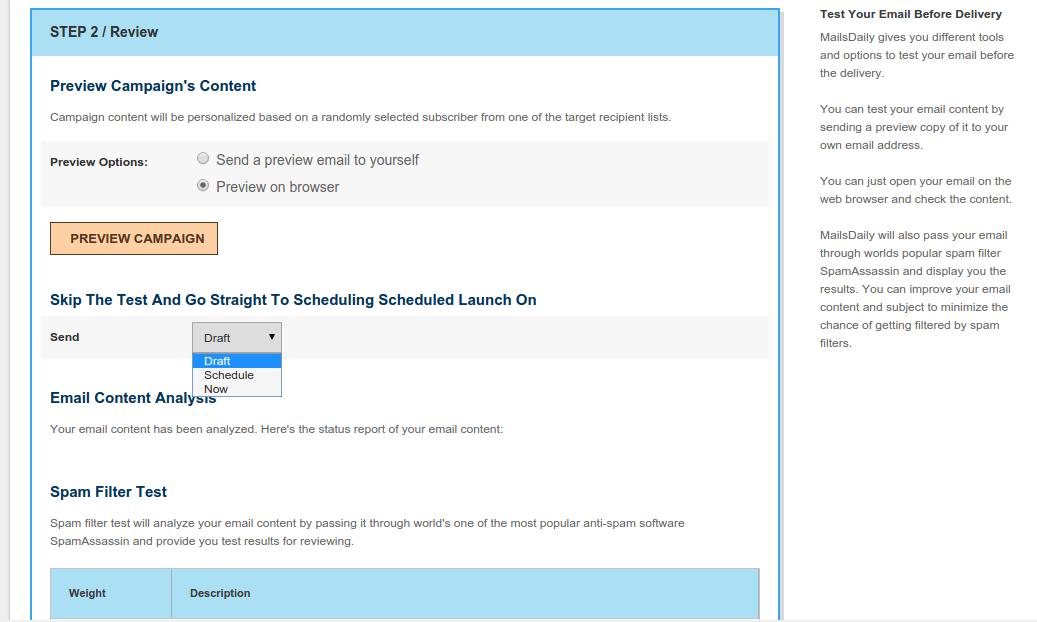
The last step of campaign email creation is the preview of your campaign’s content. You can verify how does it look by sending an email to a designated email address or on your browser.

The review screen will also give you the details of the content analysis and spam testing.

Use the drop down menu “send” to schedule the campaign, there are four scheduling options available for every campaign

Now
If this option is selected the campaign will start sending immediately.

Schedule
If you select this option then you will have to set the date and time for the campaign to start sending emails to your mailing lists.

Draft
If this option is selected then the campaign will be saved under the drafts folder and will never start.

User Interface

MailsDaily user interface is an intuitive and well designed interface keeping the user experience in mind. MailsDaily’s user area interface is built from ground up to address the requirements of today’s Next Generation, Natural User Interfaces!

You will realize the advantages of this when you start using the application. Every campaign, list and subscriber has their own overview pages with detailed reports and statistics. All actions can be performed through this overview pages.

To better understand the different areas of the User Interface, please refer to the diagram below:

User Interface

User Interface

The user interface is divided into four parts

  1. Main navigation and settings functions
    The main navigation has four tabs – Dashboard, Subscribers, Campaigns and Report . These can be seen in the above screen shot. These tabs will help you navigate through different parts of the MailsDaily user interface. These four main tabs are the core functions of MailsDaily system.
  2. Quick Access Functions and quick help
    On several screens across MailsDaily interface, you will find quick help available to you on the right hand side of the user interface. The dashboard of the system will also have a quick access menu which will allow you to basically create a campaign or create a new mailing list from the dashboard screen itself.
  3. Overview of the system
    The overview of the system will give you the statistical data pertaining to the overall system activity along with the recent campaigns.The recent campaigns section will also give you the details about the email opens, link clicks, unsubscriptions etc. next to the campaign.
  4. Settings & Log Out
    The 4th section will help you fine tune your account settings and log out button for logging out.

Subscriber Interface

MailsDaily subscriber interface is for the subscribers who wants to manage their subscription options if they are allowed to.

The subscriber area is accessible only if the end user clicks on the subscriber login link from within the campaign. When they click this link they are provided a screen allowing them to manage the mailing list options as shown below.

Subscriber Interface

Subscriber Interface

The subscriber interface is divided into three parts

  1. Main navigation (Lists)
    The main navigation has only one tab called “Lists” and after you click on the login link you land into your subscriber area with the Lists Browser in front of you as shown in the above screen.
  2. Logout
    Link “Logout” can log you out of the system.
  3. List Browser
    This shows all the lists you are subscribed to – click on each one of them and you will be able to unsubscribe or save your preferences.

Hard bounce & Soft bounce Rule of MailsDaily

Types of Bounces (Hard/Soft/Other)

MailsDaily breaks bounce messages down into three different types:

Type Description
Hard A hard bounce is where the ISP is explicitly saying that this email address is not valid. Typically this is a “user does not exist” error message.
Soft A soft bounce is an error condition, which if it continues, the email address should be considered invalid. An example is a “DNS Failure” (code 21) bounce message. This can happen because the domain name no longer exists, or this could happen because the DNS registration expired and will be renewed tomorrow, or there was a temporary DNS lookup error. If the “DNS failure” messages persist, then we know the address is bad.
Other An other bounce is an error condition where the delivery failed which does not mean that the email address is bad. Typically this is a spam blocking. Instead of removing the email addresses from your list, you would want to solve whatever caused the blocking and restore delivery to these addresses.

About “other” bounces: In the future we may build a quarantine facility for email addresses that consistently fail with “other” bounces. The reason is as follows: If an email address bounces with an “other” bounce every time we send to it, then there is no point in continuing to send to it, which may just bother the ISP. To solve this problem, instead of removing the email address from the list, the email address would be placed in a quarantine that would prevent you from sending to that email address. When this happens, you would be notified of the quarantine, and after fixing the root delivery problem, you could easily release the email addresses from quarantine. Continue reading

Setting up your first mailing list

MailsDaily offers an easy way to create and manage mailing lists. In this chapter we will take a look at creating your first mailing list.

Before we proceed to create our first mailing list we need to understand two key concepts.

Key Concepts

Single Opt-in Mailing List

  • Email addresses on a (single) opt-in list are not confirmed.
  • Anybody can submit anybody’s address to the list, and it will be there until it is unsubscribed

Double Opt-in Mailing List

  • On a double opt-in list, all email addresses must be confirmed before they are added.
  • A request for confirmation is sent to the submitted address and the address owner must take necessary action to confirm that he/she is the owner of the email address, the address is working and he/she indeed wants to subscribe.
  • Most often, the confirmation action is as simple as replying to the confirmation request or clicking on a link.

Continue reading

Segments

This topic will cover everything related to the data segmentation from your mailing lists. Learn how relevancy drives response and the various different ways you can split up your email lists to ensure you hit the target more often.

Segmentation of your address database is widely regarded as a proven way to improve responses and results.

Continue reading

Surveys

A Survey can be integrated with your website, microsite or landing pages. To create new Survey forms for your mailing list(s) follow the steps below.

  1.  Go to Subscribers
  2.  This will show you the existing lists available within your system.
  3.  Create new list with the List Type is Survey.
  4.  This will bring up the list overview page
  5. Create questions & answers for survey by using custom fields functions
  6.  Click on the “Create Survey Form” button found on the upper right corner of the page.
  7.  This will take you to a wizard where you can create the Survey forms

Continue reading