Author Archives: admin

Creating & Managing Email Templates

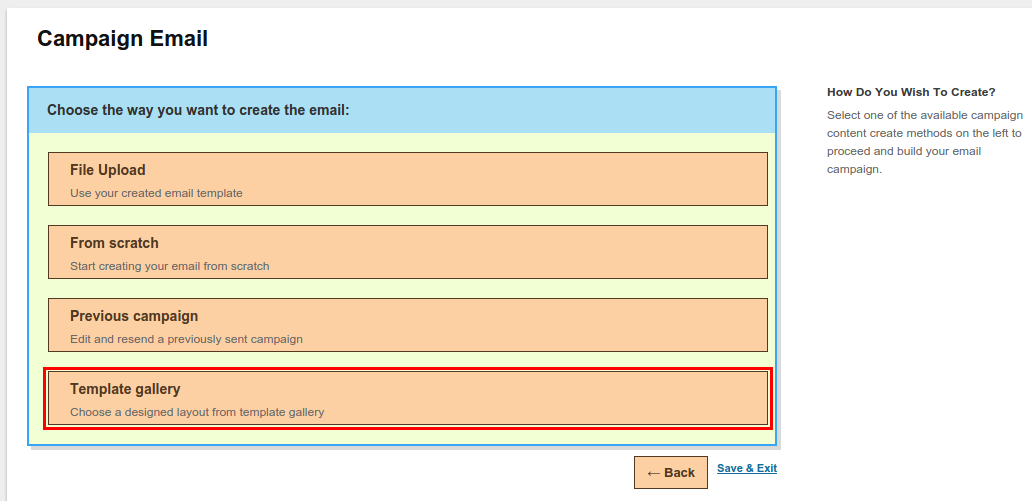
MailsDaily provides an advanced email template builder which can help you reduce the time and effort to create high quality and flexible campaign emails. The new template builder will help you create sophisticated templates with editable regions [text only or html], regions which can be duplicated and regions which are linked with each other, all this is with a minimal knowledge of programming or html coding.

In this chapter we will learn how to create new templates and manage the existing templates within your account.

  • Creating a new email template
  • Managing existing template

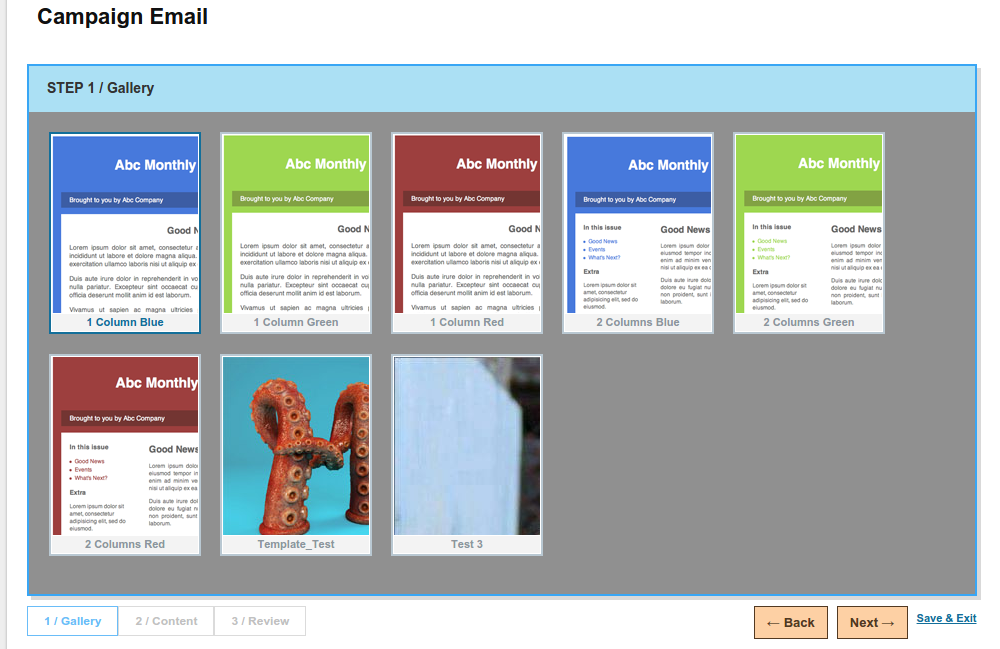
Email templates are pre-defined html content files which can be customized and modified when you create a new email marketing campaign. These templates can help you quickly put your content and other related information in a nicely formatted manner.

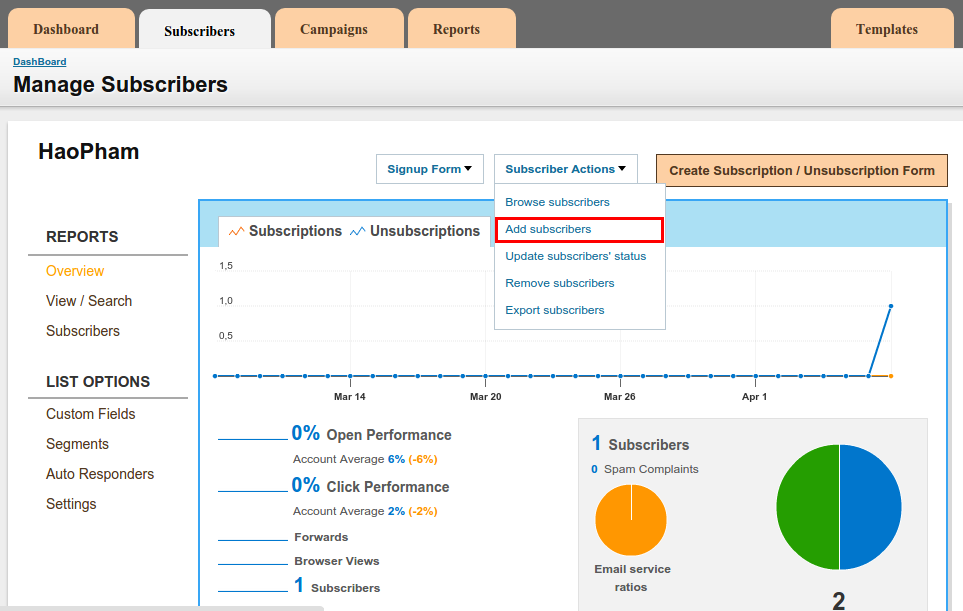
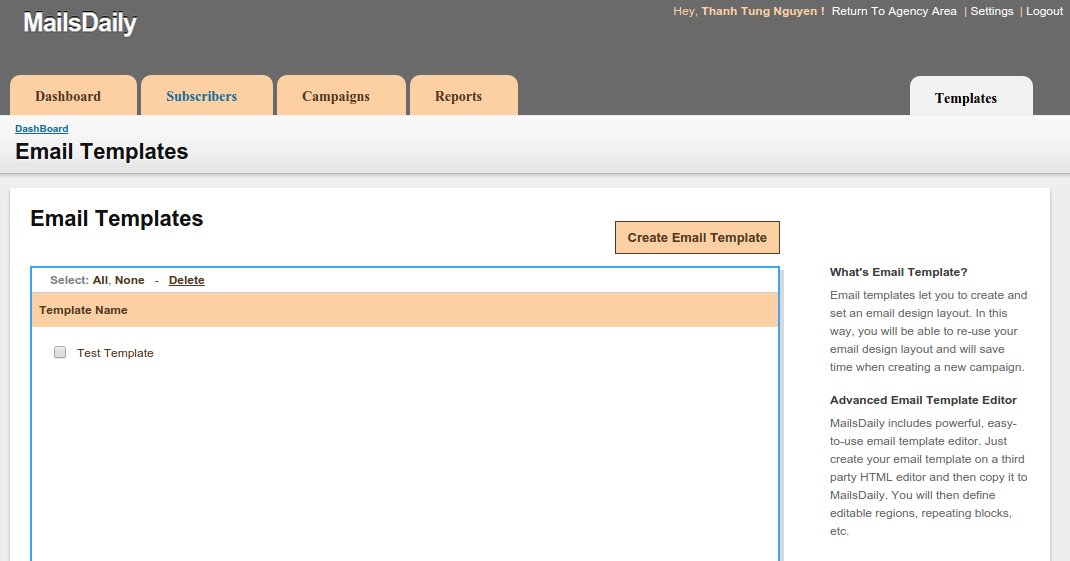
  • To create a new template go to “Settings” tab.
  • Click on the “Email Templates” menu
  • This will take you to the email template manager, where you can see the existing templates within the system and you can also create a new one.

Selection_044

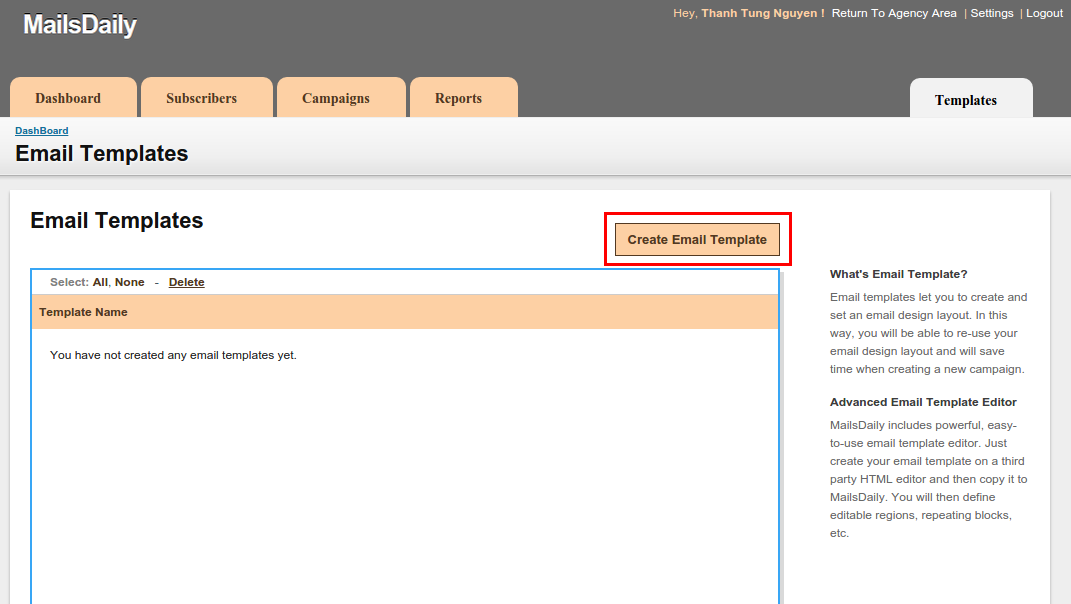
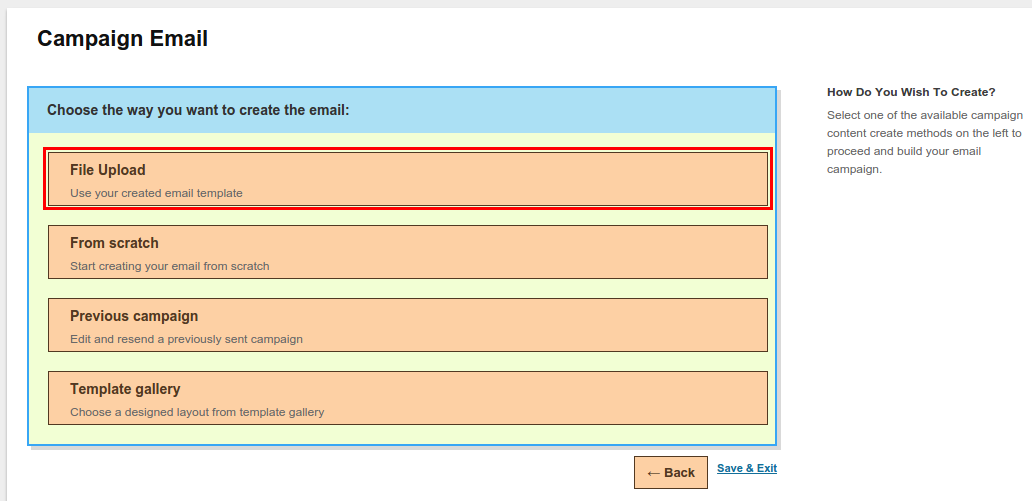
  • Click on the “Create email template” link as highlighted above.Please remember that you need to make sure that your html code for the email template design should be ready with you so that you before you start creating a new email template using the template builder.

It is possible that you can build the template code on the fly. But If the basic structure of the template is ready, you can quickly customize the same and add the edit regions and other parameters to it.

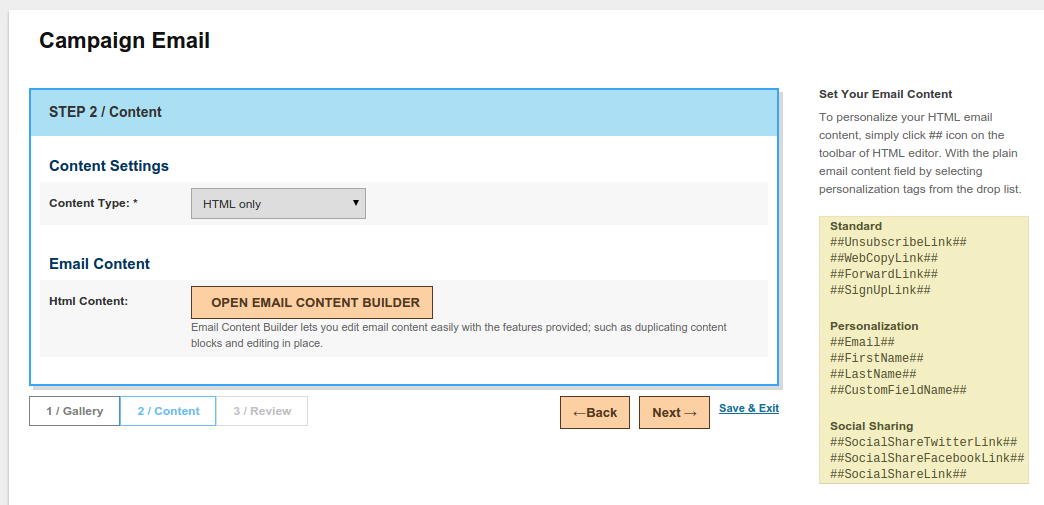
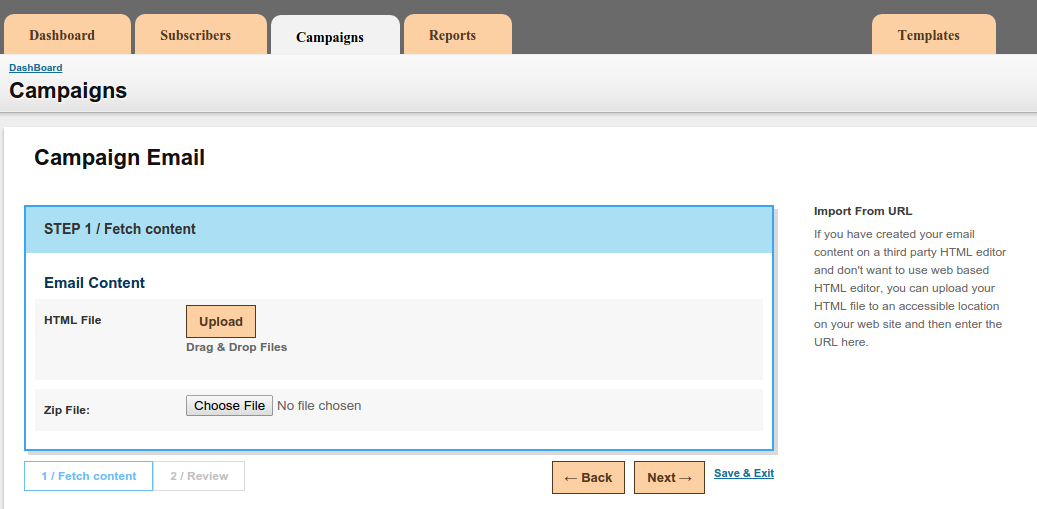
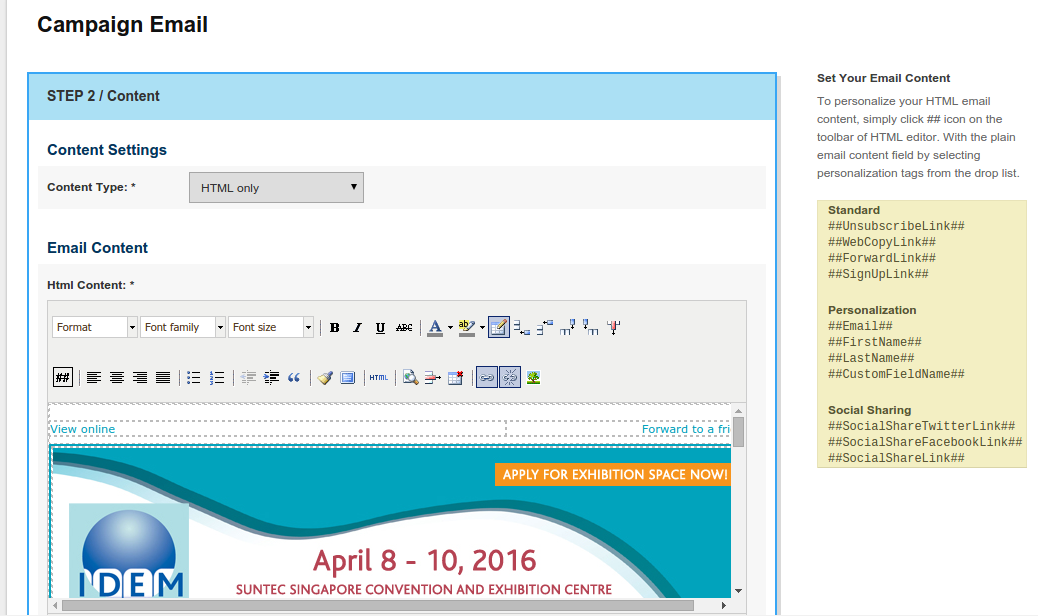
Once you go to the create new template menu, MailsDaily will allow you to configure preferences of your email template such as name of the template, description and a thumb nail picture on the first tab. On the second tab, you will need to add the email content such as Subject, HTML Content and Text based content.

Selection_045

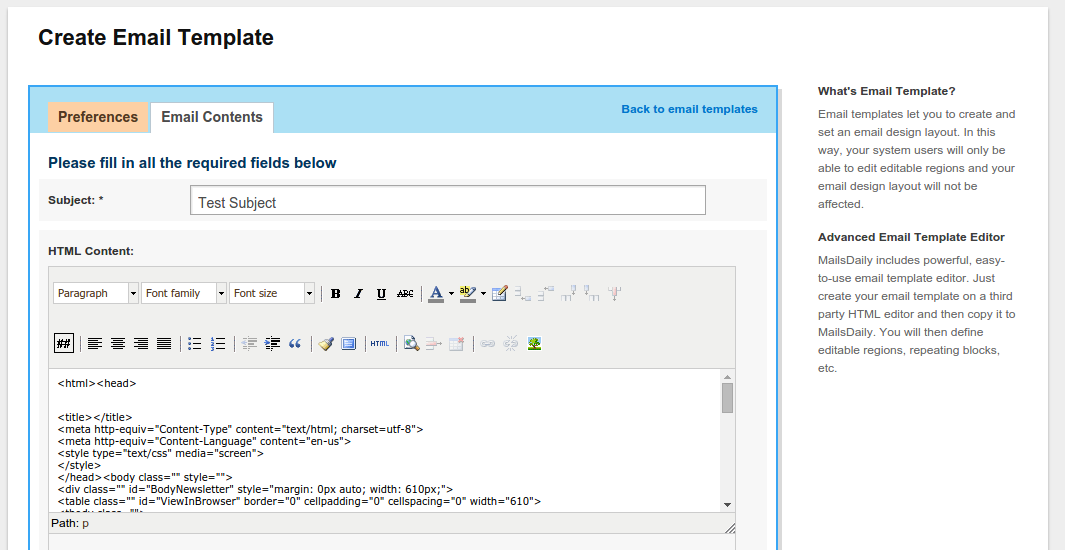
As seen in the above screen you can populate the preferences and add the Email Contents – once you populate the necessary options click on the “Proceed to Template Builder” button.

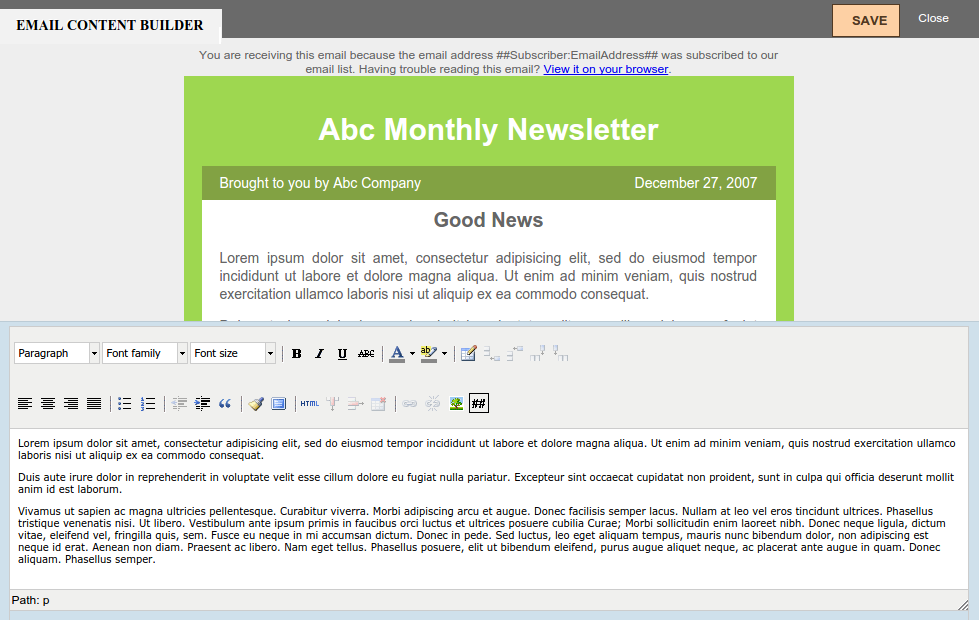
This will open up a template builder interface as shown in the below screenshot.

Selection_047

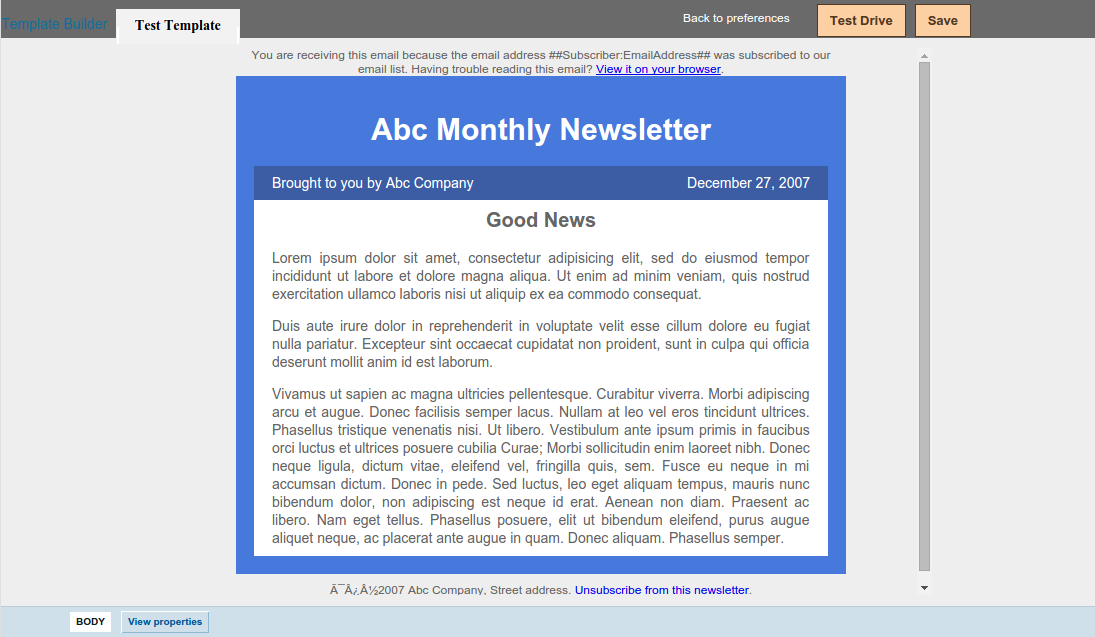
If you look at the above screenshot – it renders the html code you provided under the email contents tab to a nicely formatted html layout. Now as you can see this is a generic layout, the template builder will help you define the edit regions and other types of regions.

In order to make a certain html block editable, you will need to click on that particular block and the bottom of the screen will show you the structure of the nested table’s or div tags. This way ,you know what part of the template you are editing. When you click on any of the html block you will see a dotted or solid line surrounding the block.

Selection_046

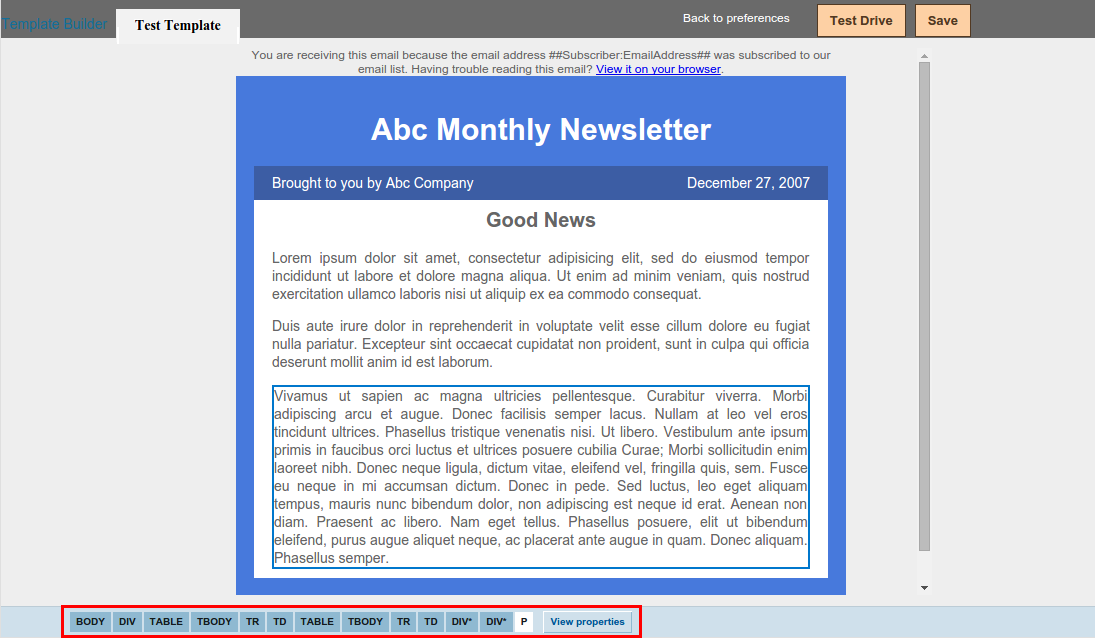
The highlighted sections in the above screen shows you that when you click on the element, the bottom bar shows you the html tags which are built around the element – in order to make this region into a dynamic one click on the “View properties” button at the bottom.

Selection_048

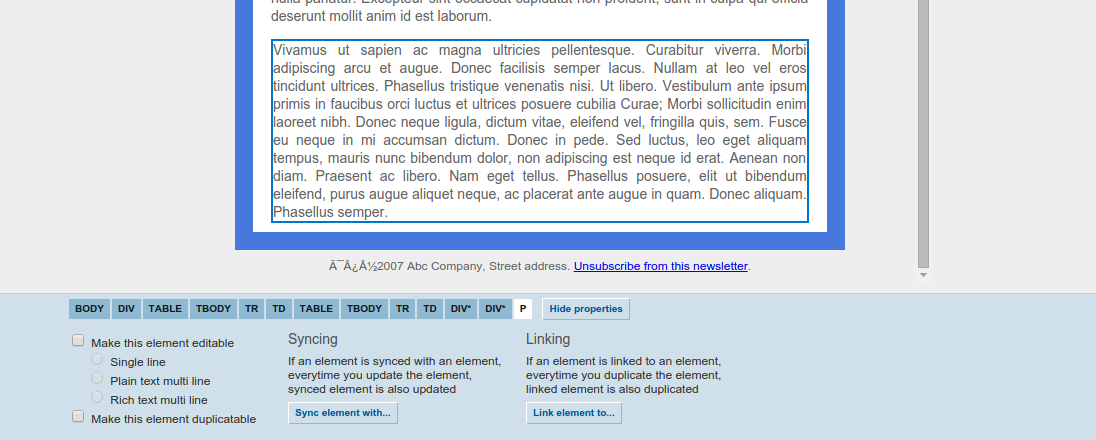
We have several options which we can use as shown in the above screenshot, which we can apply to this particular element.

  1. Make this element editable
    Single line
    You can tick this option to make the element editable with single line editing.
    Plain text multi line

    Tick this option to create a plain text editable element with multi line support.

    Rich text multi line
    Tick this option to create a rich text multi line editable element – this option will allow you to add rich text to the element.

  2. Make this element duplicable, use this option to make the selected element duplicable. This way, you can duplicate the element several times within your content.
  3. Syncing, If an element is synced with an element, every time you update the element, synced element is also updated
  4. Linking, If an element is linked to an element, every time you duplicate the element, linked element is also duplicated

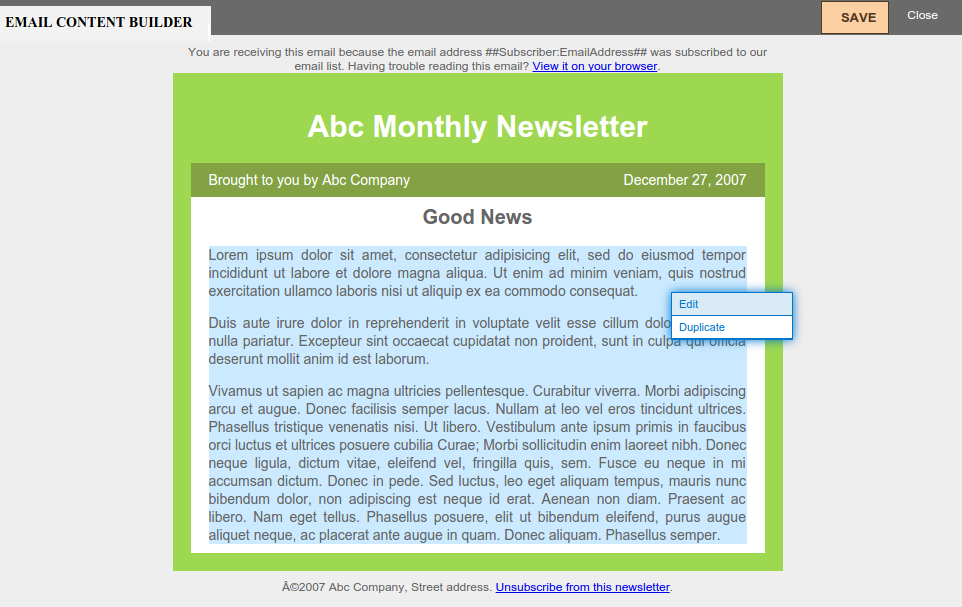
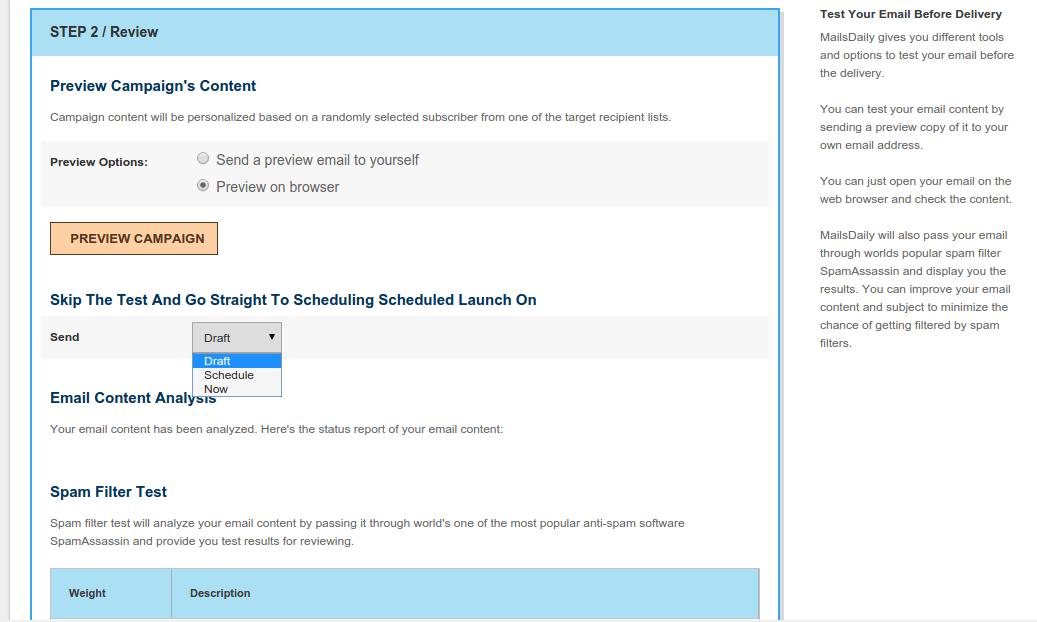
For this example, we are going to make the selected element editable as well as duplicable. Once you make the necessary changes click on the “Test Drive” button at the top of the template builder to see how your template actually looks like and functions when you create a campaign using the same.

Menu_049

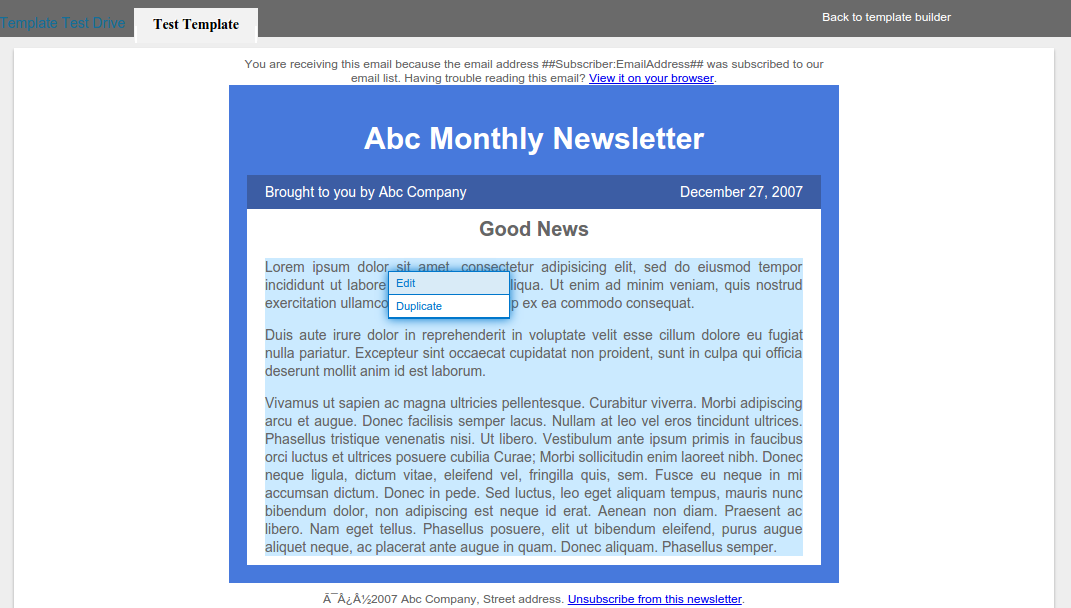
When we test drive the template, you should see the rendered output of the template and when you click on the element which you configured as editable and duplicable, it should show you a menu pertaining to those functions as shown in the above screen.

Test all the elements and then once you are satisfied – click on “Back to template builder” and then save the template.

  • To manage existing templates go to “Settings” tab.
  • Click on the “Email Templates” menu
  • This will take you to the email template manager, where you can see the existing templates within the system and you can also create a new one.

Selection_050

If you have templates within your account the interface will list all the templates and will allow you to manage them. In order to modify the template and its settings, you just select the necessary template and do the needful.

Export Subscribers

  • To export subscribers, go to “Lists
  • Select the Mailing List you wish to export subscribers from
  • The List Browser screen will have a drop down menu called “Subscriber Actions
  • Select “Export Subscribers” from this drop down

Selection_043

List Name
This shows the list name you want to export subscribers from.

Subscribers
Using this drop down you can define what kind of subscribers you want to export from your mailing list

Active Subscribers
This will export all active subscribers if selected

Suppressed Subscribers
This will export all suppressed subscribers if selected

Not opted-in for specified period of days
This will export the subscribers who have not opted-in by click on the confirmation link for a certain number of days.

Given email addresses
You can copy and paste email id’s per new line with this option

Segments
You can select the specific segments of subscribers

Bounce Types
You can select the soft or hard bounced subscribers to be exported from the list

File Format
Select in which file format you need to export the subscriber, there are three different file formats.

CSV – comma separated values
XML – extensible markup langauge
TAB – tab delimited text file

Fields
Please choose the fields you want to include within the exported data. You can select multiple fields by holding down the CTRL key and selecting the fields.

When you are done populating the above options hit the “Export Subscribers” button, the subscribers will be exported from the related mailing list.

Delete Subscribers

  • To delete subscribers, go to “Lists”
  • Select the Mailing List you wish to delete subscribers from
  • The List Browser screen will have a drop down menu called “Subscriber Actions
  • Select “Remove Subscribers” from this drop down

Selection_042

List Name
This shows the list name you want to remove subscribers from.

Subscribers
Using this drop down you can define what kind of subscribers you want to remove from your mailing list

Active Subscribers
This will remove all active subscribers if selected

Suppressed Subscribers
This will remove all suppressed subscribers if selected

Not opted-in for specified period of days
This will remove the subscribers who have not opted-in by click on the confirmation link for a certain number of days.

Given email addresses
You can copy paste email id’s per new line with this option

Segments
You can select the specific segments of subscribers

Bounce Types
You can select the soft or hard bounced subscribers to be removed from the list

Add / Remove subscribes to the suppression list
Tick this option and add email addresses to suppression list so that you can prevent them to be subscribed/imported to this list later.

When you are done populating the above options, hit the “Remove Subscribers” button the subscribers will be removed from the related mailing list.

Browse Subscribers

  • To browse subscribers, go to “Lists
  • Select the Mailing List you wish to browse subscribers for
  • The List Browser screen will have a dropdown menu called “Subscriber Actions
  • Select “Browse Subscribers” from this drop down

Selection_041

This is where you will see all the subscribers within your mailing list. You can also export and delete the subscribers from the same screen. You will also have the ability to display custom fields if the subscribers data has them and also can filter or sort the subscribers based on the fields and ascending and descending order.

Adding subscribers using external mysql database(s)

  • To add new subscribers using external mysql database, go to “Lists
  • Click on the mailing list you wish to add new subscribers to
  • The List Browser screen will have a dropdown menu called “Subscriber Actions
  • Select “Add Subscribers” from this drop down

Selection_038

This screen will help you choose the method you wish to use for adding new subscribers – for this chapter we will use the first method “External MySQL Database“.

  •     Click on the “External MySQL Database” method and this will take you to the wizard for the method.

Selection_040

Host Address
Enter the host address for your external mysql database

Port
define the MySQL Port number in case if its not running on a standard port 3306

Username
Enter the username for accessing the mysql database

Password
Enter the password

Database
Enter the name of the database

SQL Query
Enter the SQL query in order to select the records from the database
For Example: SELECT * FROM clients WHERE ‘Subscribe’=1

Click the “Next” button so that we can go to the step 2 for mapping fields.

step2-mysql

Match the subscriber fields
Here you will need to map the fields within your system with the import data fields. If you have custom fields within your mailing list they will be displayed in the drop down.

You should always map the email address field with the email address within import data. There is an option to ignore certain fields as well if you do not wish to import them.

Import Settings
If you are going to import new subscribers to the list, always select “Don’t add to suppression list” option. If you are importing subscribers to suppression list global or list based then select the appropriate option

Update subscriber information of duplicates with import data
Enable this option so that when you import the data for the subscribers which are duplicate or subscribers who are already within the mailing list, then their information will be updated with the new imported information.

Do not send opt-in confirmation email, subscribe immediately
If this option is ticked, the system will not send the opt-in confirmation email and will just subscribe the subscriber immediately to the mailing list

Trigger auto responders, subscription behaviors, web services and update statistics
If you enable this option, the system will trigger auto responders, subscription behaviors and web services actions related to the mailing list you are importing your subscribers to.

Once the options are populated click on the “Next” button to proceed to the import results step. The result screen will give you the details about the import process completion.

Add Subscribers using file upload

  • To add new subscribers using file upload, go to “Lists”
  • Click on the mailing list you wish to add new subscribers to
  • The List Browser screen will have a dropdown menu called “Subscriber Actions”
  • Select “Add Subscribers” from this drop down

Selection_035

This screen will help you choose the method you wish to use for adding new subscribers – for this chapter we will use the first method “File upload“.

  • Click on the “File Upload” method and this will take you to the wizard for the method.

Selection_036

Select the file from your computer
Click on the Choose file button and select the CSV or text file from your computer

Fields terminated by
If you are going to import the subscribers having custom fields then you will need to define the field terminator – Mailsdaily supports three terminators comma, semicolon, and tab.

Fields enclosed by
You will need to select the character which will act as an enclosure for the field – for example field between single or double quotes.

If the data you are going to paste has the fields enclosed using single or double quotes, you will have to select the appropriate option.

Once you populate the fields – click on the “Next” button to go to the Step 2 of file upload method.

Selection_037

Match the subscriber fields
Here you will need to map the fields within your system with the import data fields. If you have custom fields within your mailing list they will be displayed in the drop down.

You should always map the email address field with the email address within import data.

There is an option to ignore certain fields as well if you do not wish to import them.

Import Settings
If you are going to import new subscribers to the list, always select “Don’t add to suppression list” option.

If you are importing subscribers to suppression list global or list based then select the appropriate option

Update subscriber information of duplicates with import data
Enable this option so that when you import the data for the subscribers which are duplicate or subscribers who are already within the mailing list then their information will be updated with the new imported information.

Trigger auto responders, subscription behaviors, web services and update statistics
If you enable this option, the system will trigger auto responders, subscription behaviors and web services actions related to the mailing list you are importing your subscribers to.

Once the options are populated click on the “Next” button to proceed to the import results step. The result screen will give you the details about the import process completion.

Adding Subscribers using Copy / Paste method

This method is the simple most and requires only few minutes to import your subscribers, although when you are planning to import large amount of subscribers this method is not good enough and will be time consuming.

In order to add subscribers using copy / paste method – please follow the steps below.

  • Go to Lists
  • Click on the drop down called Subscriber Actions
  • Click on the Add Subscribers
  • Click on the Copy / Paste link.

Menu_030

Selection_031

Selection_032

Enter email addresses
Enter each email address on a new line. If you want to import more data related to the subscriber then add these fields with a comma or the field terminator you are using.
Example subscriber1@domain.com,Name,Surname

Fields terminated by
If you are going to import the subscribers having custom fields then you will need to define the field terminator – MailsDaily supports three terminators comma, semicolon, and tab.

Fields enclosed by
You will need to select the character which will act as an enclosure for the field – for example field between single or double quotes.

If the data you are going to paste has the fields enclosed using single or double quotes, you will have to select the appropriate option.

  • Click on the “Next” button to go to the step 2
  • This will bring up the screen for mapping fields

Selection_033

Match the subscriber fields
Here you will need to map the fields within your system with the import data fields. If you have custom fields within your mailing list they will be displayed in the drop down.

You should always map the email address field with the email address within import data. There is an option to ignore certain fields as well if you do not wish to import them.

Import Settings
If you are going to import new subscribers to the list, always select “Don’t add to suppression list” option.
If you are importing subscribers to suppression list global or list based then select the appropriate option.

Update subscriber information of duplicates with import data
Enable this option so that when you import the data for the subscribers which are duplicate or subscribers who are already within the mailing list then their information will be updated with the new imported information.

Trigger auto responders, subscription behaviors, web services and update statistics
If you enable this option the system will trigger auto responders, subscription behaviors and web services actions related to the mailing list you are importing your subscribers to.

When you are done populating these options hit the “Next” button to complete the import. The result screen will give you the details about the import process completion.

Selection_034

Creating new campaign from template gallery

There are two ways in which anyone can start creating a new campaign irrespective of the method they use. You can use “Campaigns” tab or if you are on the Dashboard you can click on the “Create New Campaign” link under the Quick Links.

  • Click on the “Campaigns” tab
  • Click on the “Create New campaign” under the campaign browser

Selection_011

If you look at the campaign browser screenshot above, you will realize that it gives you the ability to browse through the campaigns within your account. You will also be able to track all the campaigns which are sent, are in outbox, are being created and in draft mode, are scheduled, are paused and are pending approval.

You can manage tags which can allow you to categorize your campaigns.

Selection_012

Campaign Name
Enter the name of your campaign

Recipients
Select the mailing list or a segment for your campaign.You can select single or multiple lists of segments.

Apply A/B Split Testing
By applying A/B split testing you can test different versions of your campaign settings or content. You can set the test size, duration and how to determine the winner. This helps you optimize your campaign in a better manner.

Publish this campaign to RSS Feed
When you check this box, your subscribers will be able to see this campaign in their list’s rss feeds.

Google Analytics Integration
MailsDaily integrates seamlessly with the Google Analytics web service to help you track recipient activities on your website coming from your campaign.

We will learn about this feature in details in a separate topic – click here for detailed information.

  • When you are done populating these fields hit the “Create Campaign and Edit Campaign Email”
  • This will bring up the create new campaign selection screen.

Selection_014

Subject
Define the subject line for your campaign email.

Name
Enter the name which will be used for the from field of your campaign email

Email address
Enter the email address which will be used for the from email field of your campaign email.

Reply to Information
You can use the same reply to information defined the name and email address fields above or use the new one by un-checking the option and entering the different reply-to information

  • Click on the “Next” button to go to the Content part of the campaign email creation.

Selection_019_3

  • Click on the third option “Template gallery”

Selection_024

  • Select the template from gallery as shown in the below screenshot and hit the “Next” button.

Selection_025

Content Type
Select the content type – whether you are going to send an HTML email or Text. You can also send a multi-part email which will carry HTML as well TEXT based content and render it at the end-users end according to their email reader.

HTML Content
Now Click on the “Open Email Content Builder” and customize your newsletter content

Menu_028

The above email content builder will help you add your own content within the available editable regions. MailsDaily has an advanced template engine which allows you to easily edit your content within the pre-defined campaign template.

In order to edit the content, you just have to place your mouse on the content box and click your left mouse key once – if the area is editable it will give you the “Edit” menu as shown in the above screenshot.

In the above screenshot we can see “Edit” as well “Duplicate” – this means the region we clicked on can be edited with custom content and you can also duplicate the block of text as well.

When you click the edit button it will give you the editor which can be seen in the below screen shot.


Selection_029

If you look at the screenshot above you will see its a full fledged html content editor – similar to this you can also have text only regions.

Once your content is populated you can simply hit the “Save” button and save the content and get out of the content editing screen. Now click on the “Next” button found on the campaign email creation wizard to go to the final “Review” of your campaign email.

Selection_018

The last step of campaign email creation is the preview of your campaign’s content. You can verify how does it look by sending an email to a designated email address or on your browser.

The review screen will also give you the details of the content analysis and spam testing.

Use the drop down menu “send” to schedule the campaign, there are four scheduling options available for every campaign

Now
If this option is selected the campaign will start sending immediately.

Schedule
If you select this option then you will have to set the date and time for the campaign to start sending emails to your mailing lists.

Draft
If this option is selected then the campaign will be saved under the drafts folder and will never start.

Creating new campaign from file upload.

There are two ways in which anyone can start creating a new campaign irrespective of the method they use. You can use “Campaigns” tab or if you are on the Dashboard you can click on the “Create New Campaign” link under the Quick Links.

  • Click on the “Campaigns” tab
  • Click on the “Create New campaign” under the campaign browser

Selection_011

If you look at the campaign browser screenshot above, you will realize that it gives you the ability to browse through the campaigns within your account. You will also be able to track all the campaigns which are sent, are in outbox, are being created and in draft mode, are scheduled, are paused and are pending approval.

You can manage tags which can allow you to categorize your campaigns.

Selection_012

Campaign Name
Enter the name of your campaign

Recipients
Select the mailing list or a segment for your campaign.You can select single or multiple lists of segments.

Apply A/B Split Testing
By applying A/B split testing you can test different versions of your campaign settings or content. You can set the test size, duration and how to determine the winner. This helps you optimize your campaign in a better manner.

Publish this campaign to RSS Feed
When you check this box, your subscribers will be able to see this campaign in their list’s rss feeds.

Google Analytics Integration
MailDaily integrates seamlessly with the Google Analytics web service to help you track recipient activities on your website coming from your campaign.

We will learn about this feature in details in a separate topic – click here for detailed information.

  • When you are done populating these fields hit the “Create Campaign and Edit Campaign Email”
  • This will bring up the create new campaign selection screen.

Selection_014

Subject
Define the subject line for your campaign email.

Name
Enter the name which will be used for the from field of your campaign email

Email address
Enter the email address which will be used for the from email field of your campaign email.

Reply to Information
You can use the same reply to information defined the name and email address fields above or use the new one by un-checking the option and entering the different reply-to information

  • Click on the “Next” button to go to the Content part of the campaign email creation.

Selection_019_2

  • Click on the third option “File Upload”

Selection_023


HTML File
Choose a file HTML.

Zip File
Choose a file zip contain images file used in file HTML.

  • Click on the “Next” button to go to the last step of the campaign email creation.

Selection_018

The last step of campaign email creation is the preview of your campaign’s content. You can verify how does it look by sending an email to a designated email address or on your browser.

The review screen will also give you the details of the content analysis and spam testing.

Use the drop down menu “send” to schedule the campaign, there are four scheduling options available for every campaign

Now
If this option is selected the campaign will start sending immediately.

Schedule
If you select this option then you will have to set the date and time for the campaign to start sending emails to your mailing lists.

Draft
If this option is selected then the campaign will be saved under the drafts folder and will never start.


Creating new campaign from previously sent Campaign

There are two ways in which anyone can start creating a new campaign irrespective of the method they use. You can use “Campaigns” tab or if you are on the Dashboard you can click on the “Create New Campaign” link under the Quick Links.

  • Click on the “Campaigns” tab
  • Click on the “Create New campaign” under the campaign browser

Selection_011

If you look at the campaign browser screenshot above, you will realize that it gives you the ability to browse through the campaigns within your account. You will also be able to track all the campaigns which are sent, are in outbox, are being created and in draft mode, are scheduled, are paused and are pending approval.

You can manage tags which can allow you to categorize your campaigns.

Selection_012

Campaign Name
Enter the name of your campaign

Recipients
Select the mailing list or a segment for your campaign.You can select single or multiple lists of segments.

Apply A/B Split Testing
By applying A/B split testing you can test different versions of your campaign settings or content. You can set the test size, duration and how to determine the winner. This helps you optimize your campaign in a better manner.

Publish this campaign to RSS Feed
When you check this box, your subscribers will be able to see this campaign in their list’s rss feeds.

Google Analytics Integration
MailsDaily integrates seamlessly with the Google Analytics web service to help you track recipient activities on your website coming from your campaign.

We will learn about this feature in details in a separate topic – click here for detailed information.

  • When you are done populating these fields hit the “Create Campaign and Edit Campaign Email”
  • This will bring up the create new campaign selection screen.

Selection_014

Subject
Define the subject line for your campaign email.

Name
Enter the name which will be used for the from field of your campaign email

Email address
Enter the email address which will be used for the from email field of your campaign email.

Reply to Information
You can use the same reply to information defined the name and email address fields above or use the new one by un-checking the option and entering the different reply-to information

  • Click on the “Next” button to go to the Content part of the campaign email creation.

Selection_019_1

  • Click on the third option “Previous Campaign”

Selection_020


  • Select the campaign from the drop down as shown in the below screenshot and hit the “Next” button.

Selection_022

  • Click on the “Next” button to go to the last step of the campaign email creation.

Selection_018

The last step of campaign email creation is the preview of your campaign’s content. You can verify how does it look by sending an email to a designated email address or on your browser.

The review screen will also give you the details of the content analysis and spam testing.

Use the drop down menu “send” to schedule the campaign, there are four scheduling options available for every campaign

Now
If this option is selected the campaign will start sending immediately.

Schedule
If you select this option then you will have to set the date and time for the campaign to start sending emails to your mailing lists.

Draft
If this option is selected then the campaign will be saved under the drafts folder and will never start.